1. quicknet
2. dpwelib
3. feacat
4. pfile_utils
5. libx11-dev
6 HTK
2. dpwelib
3. feacat
4. pfile_utils
5. libx11-dev
6 HTK

Setting up on the server using source files:
apr-1.3.5.tar
apr-util-1.3.7.tar
sqlite-amalgamation-3.6.13.tar
subversion-1.6.2.tar
Create a new repository :
svnadmin create /home/sadm/svn/repos
Start the svnserve deamon:
svnserve –d –r /home/sadm/svn/repos
References:
INSTALLING ACTIONS
Installing actions on your computer is rather straight forward. You can install the action file anywhere on your computer hard disk. It does not have to be installed in the Photoshop directory hierarchy.
Once you have copied the action file onto your computer, you have to load the actions within Photoshop so that the actions are available for use. To load the actions, select "Load Actions ..." from the Actions palette menu as shown below:
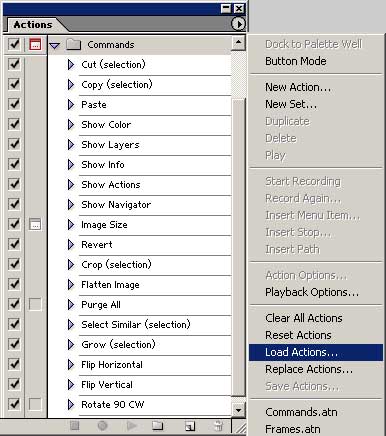
Locate your action file and select the "Load" button. Your actions are added to the Actions palette.
EXPORTING ACTIONS
Exporting actions is called "Save Actions ..." in Photoshop. You export the actions for backup purposes and to share with others. Only action sets can be exported; individual actions cannot be exported. To export an action set, you must first select the action set from the Action palette. Then select "Save Actions ..." from the Action palette menu as shown below:
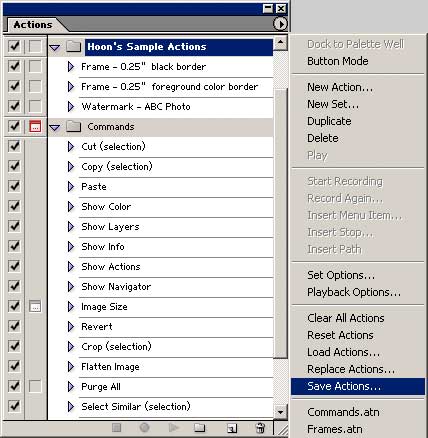
Once an action set has been exported (saved), it can be moved and copied as needed.
Very Short Tutorial: How to submit jobs through SGE?
Construct a short shell script that runs your program. In this example, we create submit_tut.sh with the following contents:
date
hostname
uptime
echo parameters are $*
date
Important Note: Please make sure that your script does not die before all your processes complete or our cleanup script will kill your processes. This can be assured by having a "wait" at the end of your script if you "background" any of your processes or (better) not use any background processes at all.
Load the SGE settings.
$ . /opt/sge/settings.sh
Note the "." in front of "/opt/sge/settings.sh". You need that to source the settings file or it will not work!! Do this exactly once for every session you want to use SGE. You may also want to put it in your .profile.
Submit your job:
qsub < jobname >
in our case:
$ qsub submit_tut.sh
$ qsub submit_tut.sh test
$ qsub submit_tut.sh test test2
Other SGE commands you might be interested in:
You can check on the progress of your jobs by using the command
$ qstat
If you wish to abort your run, you can use the command
$ qdel -u <userid> # or
$ qdel <jobid>...
Do not worry if your jobs went into the background as we have a cleanup procedure that will help you remove your processes within 5 minutes of your 'qdel'.
SGE also does process accounting. Contents of the accounting database can be access using the command
$ qacct
There is also a X11-based GUI tool for all of SGE's controls.
To start it, you need to enable X11 forwarding. Here's a link containing instructions on setting up X11 support on a Windows machine.
To verify if X11 is enabled on your particular session, just do
$ echo $DISPLAY
If the $DISPLAY variable is set to something like localhost:10.0, you're all set to go.
Load the SGE settings if you have not done so.
$ . /opt/sge/settings.sh
Start the qmon program:
$ qmon
Details about how to use the GUI and SGE are in the SGE User Guide availablehere.
Common vi editor command list
From:http://www.freeos.com/guides/lsst/misc.htm#commonvi
For this Purpose
Use this vi Command Syntax
To insert new text
esc + i ( You have to press 'escape' key then 'i')
To save file
esc + : + w (Press 'escape' key then 'colon' and finally 'w')
To save file with file name (save as)
esc + : + w "filename"
To quit the vi editor
esc + : + q
To quit without saving
esc + : + q!
To save and quit vi editor
esc + : + wq
To search for specified word in forward direction
esc + /word (Press 'escape' key, type /word-to-find, for e.g. to find word 'shri', type as
/shri)
To continue with search
n
To search for specified word in backward direction
esc + ?word (Press 'escape' key, type word-to-find)
To copy the line where cursor is located
esc + yy
To paste the text just deleted or copied at the cursor
esc + p
To delete entire line where cursor is located
esc + dd
To delete word from cursor position
esc + dw
To Find all occurrence of given word and Replace then globally without confirmation
esc + :$s/word-to-find/word-to-replace/g
For. e.g. :$s/mumbai/pune/g
Here word "mumbai" is replace with "pune"
To Find all occurrence of given word and Replace then globally with confirmation
esc + :$s/word-to-find/word-to-replace/cg
To run shell command like ls, cp or date etc within vi
esc + :!shell-command
For e.g. :!pwd
WEKA (http://www.cs.waikato.ac.nz/~ml/weka/)
is a comprehensive toolbench for machine learning and data mining. Its
main strengths lie in the classification area, where all current ML
approaches -- and quite a few older ones -- have been implemented
within a clean, object-oriented Java class hierarchy. Regression,
Association Rules and clustering algorithms have also been implemented.
However, WEKA is also quite complex to handle -- amply demonstrated by many questions on the WEKA mailing list. Concerning the graphical user interface, the WEKA development group offers documentation for the Explorer and the Experimenter, and also some Tips & Tricks (http://www.cs.waikato.ac.nz/~ml/weka/tips_and_tricks.html).
However, there is little documentation on using the command line
interface to WEKA, although it is essential for realistic learning
tasks.
This document serves as a practical introduction to the command
line interface. Since there has been a recent reorganization in class
hierarchies for WEKA, all examples may only work with versions 3.4.4
and above only (until the next reorganization, that is ;-) Basic
concepts and issues can more easily be transferred to earlier versions,
but the specific examples may need to be slightly adapted (mostly
removing the third class hierarchy level and renaming some classes).
While for initial experiments the included graphical user
interface is quite sufficient, for in-depth usage the command line
interface is recommended, because it offers some functionality which is
not available via the GUI - and uses far less memory. Should you get Out of Memory
errors, increase the maximum heap size for your java engine, usually
via -Xmx1024M or -mx1024m for 1GB. Windows users should modify
RunWeka.bat to add the parameter -mx1024M before the -jar option,
yielding java -mx1024M -jar weka.jar - the default setting of 16 to 64MB is usually too small. If you get errors that classes are not found, check your CLASSPATH: does it include weka.jar? You can explicitly set CLASSPATH via the -cp command line option as well.
We will begin by describing basic concepts and ideas. Then, we will describe the weka.filters package, which is used to transform input data, e.g. for preprocessing, transformation, feature generation and so on.
Then we will focus on the machine learning algorithms
themselves. These are called Classifiers in WEKA. We will restrict
ourselves to common settings for all classifiers and shortly note
representatives for all main approaches in machine learning.
Afterwards, practical examples are given. In Appendix A
you find an example java program which utilizes various WEKA classes in
order to give some functionality which is not yet integrated in WEKA --
namely to output predictions for test instances within a
cross-validation. It also outputs the complete class probability
distribution.
Finally, in the doc (http://weka.sourceforge.net/doc/)
directory of WEKA you find a documentation of all java classes within
WEKA. Prepare to use it since this overview is not intended to be
complete. If you want to know exactly what is going on, take a look at
the mostly well-documented source code, which can be found in
weka-src.jar and can be extracted via the jar utility from the Java
Development Kit.
If you find any bugs, less comprehensible statements, have comments or want to offer suggestions, please contact me (mailto:alex@seewald.at).
A set of data items, the dataset, is a very basic concept of machine
learning. A dataset is roughly equivalent to a two-dimensional
spreadsheet or database table. In WEKA, it is implemented by the Instances (http://weka.sourceforge.net/doc/weka/core/Instances.html) class. A dataset is a collection of examples, each one of class Instance (http://weka.sourceforge.net/doc/weka/core/Instance.html).
Each Instance consists of a number of attributes, any of which can be
nominal (= one of a predefined list of values), numeric (= a real or
integer number) or a string (= an arbitrary long list of characters,
enclosed in "double quotes"). The external representation of an
Instances class is an ARFF file, which consists of a header describing
the attribute types and the data as comma-separated list. Here is a
short, commented example. A complete description of the ARFF file
format can be found here.
% This is a toy example, the UCI weather dataset. | Comment lines at the beginning of the dataset should give an indication of its source, context and meaning. |
@relation golfWeatherMichigan_1988/02/10_14days | Here we state the internal name of the dataset. Try to be as comprehensive as possible. |
@attribute outlook {sunny, overcast rainy} | Here we define two nominal attributes, outlook and windy. The former has three values: sunny, overcast and rainy; the latter two: TRUE and FALSE. Nominal values with special characters, commas or spaces are enclosed in 'single quotes'. |
@attribute temperature real | These lines define two numeric attributes. Instead of real, integer or numeric can also be used. While double floating point values are stored internally, only seven decimal digits are usually processed. |
@attribute play {yes, no} | The last attribute is the default target or class variable used for prediction. In our case it is a nominal attribute with two values, making this a binary classification problem. |
@data | The rest of the dataset consists of the token @data, followed by comma-separated values for the attributes -- one line per example. In our case there are five examples. |
In our example, we have not mentioned the attribute type string,
which defines "double quoted" string attributes for text mining. In
recent WEKA versions, date/time attribute types are also supported.
By default, the last attribute is considered the class/target
variable, i.e. the attribute which should be predicted as a function of
all other attributes. If this is not the case, specify the target
variable via -c. The attribute numbers are one-based indices, i.e. -c 1 specifies the first attribute.
Some basic statistics and validation of given ARFF files can be obtained via the main() routine of weka.core.Instances (http://weka.sourceforge.net/doc/weka/core/Instances.html):
java weka.core.Instances data/soybean.arff
weka.core offers some other useful routines, e.g. converters.C45Loader (http://weka.sourceforge.net/doc/weka/core/converters/C45Loader.html) and converters.CSVLoader (http://weka.sourceforge.net/doc/weka/core/converters/C45Loader.html), which can be used to import C45 datasets and comma/tab-separated datasets respectively, e.g.:
java weka.core.converters.CSVLoader data.csv > data.arff
java weka.core.converters.C45Loader c45_filestem > data.arff
Any learning algorithm in WEKA is derived from the abstract Classifier (http://weka.sourceforge.net/doc/weka/classifiers/Classifier.html)
class. Surprisingly little is needed for a basic classifier: a routine
which generates a classifier model from a training dataset
(buildClassifier) and another routine which evaluates the generated
model on an unseen test dataset (classifyInstance), or generates a
probability distribution for all classes (distributionForInstance).
A classifier model is an arbitrary complex mapping from
all-but-one dataset attributes to the class attribute. The specific
form and creation of this mapping, or model, differs from classifier to
classifier. For example, ZeroR's (http://weka.sourceforge.net/doc/weka/classifiers/rules/ZeroR.html)
model just consists of a single value: the most common class, or the
median of all numeric values in case of predicting a numeric value
(=regression learning). ZeroR is a trivial classifier, but it gives a
lower bound on the performance of a given dataset which should be
significantly improved by more complex classifiers. As such it is a
reasonable test on how well the class can be predicted without
considering the other attributes.
Later, we will explain how to interpret the output from classifiers in detail -- for now just focus on the Correctly Classified Instances in the section Stratified cross-validation and notice how it improves from ZeroR to J48:
java weka.classifiers.rules.ZeroR -t weather.arff
java weka.classifiers.trees.J48 -t weather.arff
There are various approaches to determine the performance of
classifiers. The performance can most simply be measured by counting
the proportion of correctly predicted examples in an unseen test
dataset. This value is the accuracy, which is also 1-ErrorRate. Both terms are used in literature.
The simplest case is using a training set and a test set which
are mutually independent. This is referred to as hold-out estimate. To
estimate variance in these performance estimates, hold-out estimates
may be computed by repeatedly resampling the same dataset -- i.e.
randomly reordering it and then splitting it into training and test
sets with a specific proportion of the examples, collecting all
estimates on test data and computing average and standard deviation of
accuracy.
A more elaborate method is cross-validation. Here, a number of
folds n is specified. The dataset is randomly reordered and then split
into n folds of equal size. In each iteration, one fold is used for testing and the other n-1
folds are used for training the classifier. The test results are
collected and averaged over all folds. This gives the cross-validation
estimate of the accuracy. The folds can be purely random or slightly
modified to create the same class distributions in each fold as in the
complete dataset. In the latter case the cross-validation is called stratified. Leave-one-out (loo) cross-validation signifies that n
is equal to the number of examples. Out of necessity, loo cv has to be
non-stratified, i.e. the class distributions in the test set are not
related to those in the training data. Therefore loo cv tends to give
less reliable results. However it is still quite useful in dealing with
small datasets since it utilizes the greatest amount of training data
from the dataset.
The weka.filters (http://weka.sourceforge.net/doc/weka/filters/package-summary.html)
package is concerned with classes that transforms datasets -- by
removing or adding attributes, resampling the dataset, removing
examples and so on. This package offers useful support for data
preprocessing, which is an important step in machine learning.
All filters offer the options -i for specifying the input dataset, and -o
for specifying the output dataset. If any of these parameters is not
given, this specifies standard input resp. output for use within pipes.
Other parameters are specific to each filter and can be found out via
-h, as with any other class. The weka.filters package is organized into
supervised and unsupervised filtering, both of which are again
subdivided into instance and attribute filtering. We will discuss each
of the four subsection separately.
Classes below weka.filters.supervised in the class hierarchy are for
supervised filtering, i.e. taking advantage of the class information. A
class must be assigned via -c, for WEKA default behaviour use -c last.
Discretize (http://weka.sourceforge.net/doc/weka/filters/supervised/attribute/Discretize.html)
is used to discretize numeric attributes into nominal ones, based on
the class information, via Fayyad & Irani's MDL method, or
optionally with Kononeko's MDL method. At least some learning schemes
or classifiers can only process nominal data, e.g. rules.Prism (http://weka.sourceforge.net/doc/weka/classifiers/rules/Prism.html); in some cases discretization may also reduce learning time.
java weka.filters.supervised.attribute.Discretize -i data/iris.arff -o iris-nom.arff -c last
java weka.filters.supervised.attribute.Discretize -i data/cpu.arff -o cpu-classvendor-nom.arff -c first
NominalToBinary (http://weka.sourceforge.net/doc/weka/filters/supervised/attribute/NominalToBinary.html)
encodes all nominal attributes into binary (two-valued) attributes,
which can be used to transform the dataset into a purely numeric
representation, e.g. for visualization via multi-dimensional scaling.
java weka.filters.supervised.attribute.NominalToBinary -i data/contact-lenses.arff -o contact-lenses-bin.arff -c last
Keep in mind that most classifiers in WEKA utilize transformation
filters internally, e.g. Logistic and SMO, so you will usually not have
to use these filters explicity. However, if you plan to run a lot of
experiments, pre-applying the filters yourself may improve runtime
performance.
Resample (http://weka.sourceforge.net/doc/weka/filters/supervised/instance/Resample.html)
creates a stratified subsample of the given dataset. This means that
overall class distributions are approximately retained within the
sample. A bias towards uniform class distribution can be specified via
-B.
java weka.filters.supervised.instance.Resample -i data/soybean.arff -o soybean-5%.arff -c last -Z 5
java weka.filters.supervised.instance.Resample -i data/soybean.arff -o soybean-uniform-5%.arff -c last -Z 5 -B 1
StratifiedRemoveFolds (http://weka.sourceforge.net/doc/weka/filters/supervised/instance/StratifiedRemoveFolds.html)
creates stratified cross-validation folds of the given dataset. This
means that per default the class distributions are approximately
retained within each fold. The following example splits soybean.arff
into stratified training and test datasets, the latter consisting of
25% (=1/4) of the data.
java weka.filters.supervised.instance.StratifiedRemoveFolds -i data/soybean.arff -o soybean-train.arff \
  -c last -N 4 -F 1 -V
java weka.filters.supervised.instance.StratifiedRemoveFolds -i data/soybean.arff -o soybean-test.arff \
  -c last -N 4 -F 1
Classes below weka.filters.unsupervised in the class hierarchy are
for unsupervised filtering, e.g. the non-stratified version of
Resample. A class should not be assigned here.
StringToWordVector (http://weka.sourceforge.net/doc/weka/filters/unsupervised/attribute/StringToWordVector.html)
transforms string attributes into a word vectors, i.e. creating one
attribute for each word which either encodes presence or word count (-C) within the string. -W
can be used to set an approximate limit on the number of words. When a
class is assigned, the limit applies to each class separately. This
filter is useful for text mining.
Obfuscate (http://weka.sourceforge.net/doc/weka/filters/unsupervised/attribute/Obfuscate.html)
renames the dataset name, all attribute names and nominal attribute
values. This is intended for exchanging sensitive datasets without
giving away restricted information.
Remove (http://weka.sourceforge.net/doc/weka/filters/unsupervised/attribute/Remove.html) is intended for explicit deletion of attributes from a dataset, e.g. for removing attributes of the iris dataset:
java weka.filters.unsupervised.attribute.Remove -R 1-2 -i data/iris.arff -o iris-simplified.arff
java weka.filters.unsupervised.attribute.Remove -V -R 3-last -i data/iris.arff -o iris-simplified.arff
Resample (http://weka.sourceforge.net/doc/weka/filters/unsupervised/instance/Resample.html)
creates a non-stratified subsample of the given dataset, i.e. random
sampling without regard to the class information. Otherwise it is
equivalent to its supervised variant.
java weka.filters.unsupervised.instance.Resample -i data/soybean.arff -o soybean-5%.arff -Z 5
RemoveFolds (http://weka.sourceforge.net/doc/weka/filters/unsupervised/instance/RemoveFolds.html)
creates cross-validation folds of the given dataset. The class
distributions are not retained. The following example splits
soybean.arff into training and test datasets, the latter consisting of
25% (=1/4) of the data.
java weka.filters.unsupervised.instance.RemoveFolds -i data/soybean.arff -o soybean-train.arff -c last -N 4 -F 1 -V
java weka.filters.unsupervised.instance.RemoveFolds -i data/soybean.arff -o soybean-test.arff -c last -N 4 -F 1
RemoveWithValues (http://weka.sourceforge.net/doc/weka/filters/unsupervised/instance/RemoveWithValues.html) filters instances according to the value of an attribute.
java weka.filters.unsupervised.instance.RemoveWithValues -i data/soybean.arff \
  -o soybean-without_herbicide_injury.arff -V -C last -L 19
Classifiers are at the core of WEKA. There are a lot of common
options for classifiers, most of which are related to evaluation
purposes. We will focus on the most important ones. All others
including classifier-specific parameters can be found via -h, as usual.
| -t | specifies the training file (ARFF format) |
| -T | specifies the test file in (ARFF format). If this parameter is missing, a crossvalidation will be performed (default: ten-fold cv) |
| -x | This parameter determines the number of folds for the cross-validation. A cv will only be performed if -T is missing. |
| -c | As we already know from the weka.filters section, this parameter sets the class variable with a one-based index. |
| -d | The model after training can be saved via this parameter. Each classifier has a different binary format for the model, so it can only be read back by the exact same classifier on a compatible dataset. Only the model on the training set is saved, not the multiple models generated via cross-validation. |
| -l | Loads a previously saved model, usually for testing on new, previously unseen data. In that case, a compatible test file should be specified, i.e. the same attributes in the same order. |
| -p # | If a test file is specified, this parameter shows you the predictions and one attribute (0 for none) for all test instances. If no test file is specified, this outputs nothing. In that case, you will have to use callClassifier from Appendix A. |
| -i | A more detailed performance description via precision, recall, true- and false positive rate is additionally output with this parameter. All these values can also be computed from the confusion matrix. |
| -o | This parameter switches the human-readable output of the model description off. In case of support vector machines or NaiveBayes, this makes some sense unless you want to parse and visualize a lot of information. |
We now give a short list of selected classifiers in WEKA. Other classifiers below weka.classifiers in package overview (http://weka.sourceforge.net/doc/overview-tree.html) may also be used. This is more easy to see in the Explorer GUI.
trees.J48 (http://weka.sourceforge.net/doc/weka/classifiers/trees/J48.html) A clone of the C4.5 decision tree learnerbayes.NaiveBayes (http://weka.sourceforge.net/doc/weka/classifiers/bayes/NaiveBayes.html) A Naive Bayesian learner. -K switches on kernel density estimation for numerical attributes which often improves performance.meta.ClassificationViaRegression (http://weka.sourceforge.net/doc/weka/classifiers/meta/ClassificationViaRegression.html) -W functions.LinearRegression (http://weka.sourceforge.net/doc/weka/classifiers/functions/LinearRegression.html) Multi-response linear regression.functions.Logistic (http://weka.sourceforge.net/doc/weka/classifiers/functions/Logistic.html) Logistic Regression.functions.SMO (http://weka.sourceforge.net/doc/weka/classifiers/functions/SMO.html)lazy.KStar (http://weka.sourceforge.net/doc/weka/classifiers/lazy/KStar.html) Instance-Based learner. -E sets the blend entropy automatically, which is usually preferable.lazy.IBk (http://weka.sourceforge.net/doc/weka/classifiers/lazy/IBk.html) Instance-Based learner with fixed neighborhood. -K sets the number of neighbors to use. IB1 is equivalent to IBk -K 1rules.JRip (http://weka.sourceforge.net/doc/weka/classifiers/rules/JRip.html) A clone of the RIPPER rule learner. Based on a simple example, we will now explain the output of a typical classifier, weka.classifiers.trees.J48 (http://weka.sourceforge.net/doc/weka/classifiers/trees/J48.html). Consider the following call from the command line, or start the WEKA explorer and train J48 on weather.arff:
java weka.classifiers.trees.J48 -t data/weather.arff -i
J48 pruned tree | The first part, unless you specify -o, is a human-readable form of the training set model. In this case, it is a decision tree. outlook is at the root of the tree and determines the first decision. In case it is overcast, we'll always play golf. The numbers in (parentheses) at the end of each leaf tell us the number of examples in this leaf. If one or more leaves were not pure (= all of the same class), the number of misclassified examples would also be given, after a /slash/ |
Time taken to build model: 0.05 seconds | As you can see, a decision tree learns quite fast and is evaluated even faster. E.g. for a lazy learner, testing would take far longer than training. |
== Error on training data === | This is quite boring: our classifier is perfect, at least on the training data -- all instances were classified correctly and all errors are zero. As is usually the case, the training set accuracy is too optimistic. The detailed accuracy by class, which is output via -i, and the confusion matrix is similarily trivial. |
=== Stratified cross-validation === | The stratified cv paints a more realistic picture. The accuracy is around 64%. The kappa statistic measures the agreement of prediction with the true class -- 1.0 signifies complete agreement. The following error values are not very meaningful for classification tasks, however for regression tasks e.g. the root of the mean squared error per example would be a reasonable criterion. We will discuss the relation between confusion matrix and other measures in the text. |
The confusion matrix is more commonly named contingency table.
In our case we have two classes, and therefore a 2x2 confusion matrix,
the matrix could be arbitrarily large. The number of correctly
classified instances is the sum of diagonals in the matrix; all others
are incorrectly classified (class "a" gets misclassified as "b" exactly
twice, and class "b" gets misclassified as "a" three times).
The True Positive (TP) rate is the proportion of examples which were classified as class x, among all examples which truly have class x, i.e. how much part of the class was captured. It is equivalent to Recall. In the confusion matrix, this is the diagonal element divided by the sum over the relevant row, i.e. 7/(7+2)=0.778 for class yes and 2/(3+2)=0.4 for class no in our example.
The False Positive (FP) rate is the proportion of examples which were classified as class x, but belong to a different class, among all examples which are not of class x. In the matrix, this is the column sum of class x minus the diagonal element, divided by the rows sums of all other classes; i.e. 3/5=0.6 for class yes and 2/9=0.222 for class no.
The Precision is the proportion of the examples which truly have class x among all those which were classified as class x. In the matrix, this is the diagonal element divided by the sum over the relevant column, i.e. 7/(7+3)=0.7 for class yes and 2/(2+2)=0.5 for class no.
The F-Measure is simply 2*Precision*Recall/(Precision+Recall), a combined measure for precision and recall.
These measures are useful for comparing classifiers. However, if
more detailed information about the classifier's predictions are
necessary, -p # outputs just the predictions for each test
instance, along with a range of one-based attribute ids (0 for none).
Let's look at the following example. We shall assume soybean-train.arff
and soybean-test.arff have been constructed via
weka.filters.supervised.instance.StratifiedRemoveFolds as in a previous
example.
java weka.classifiers.bayes.NaiveBayes -K -t soybean-train.arff -T soybean-test.arff -p 0
0 diaporthe-stem-canker 0.9999672587892333 diaporthe-stem-canker | The values in each line are separated by a single space. The fields are the zero-based test instance id, followed by the predicted class value, the confidence for the prediction (estimated probability of predicted class), and the true class. All these are correctly classified, so let's look at a few erroneous ones. |
32 phyllosticta-leaf-spot 0.7789710144361445 brown-spot | In each of these cases, a misclassification occurred, mostly between classes alternarialeaf-spot and brown-spot. The confidences seem to be lower than for correct classification, so for a real-life application it may make sense to output don't know below a certain threshold. WEKA also outputs a trailing newline. |
If we had chosen a range of attributes via -p, e.g. -p first-last,
the mentioned attributes would have been output afterwards as
comma-separated values, in (parantheses). However, the zero-based
instance id in the first column offers a safer way to determine the
test instances.
Regrettably, -p does not work without test set, i.e. for
the cross-validation. Although patching WEKA is feasible, it is quite
messy and has to be repeated for each new version. Another way to
achieve this functionality is callClassifier, which calls WEKA
functions from Java and implements this functionality, optionally
outputting the complete class probablity distribution also. The output
format is the same as above, but because of the cross-validation the
instance ids are not in order, which can be remedied via |sort -n.
If we had saved the output of -p in soybean-test.preds, the following call would compute the number of correctly classified instances:
cat soybean-test.preds | awk '$2==$4&&$0!=""' | wc -l
Dividing by the number of instances in the test set, i.e. wc -l < soybean-test.preds minus one (=trailing newline), we get the training set accuracy.
Usually, if you evaluate a classifier for a longer experiment, you will do something like this (for csh):
java -mx1024m weka.classifiers.trees.J48 -t data.arff -i -k -d J48-data.model >&! J48-data.out &
The -mx1024m parameter for maximum heap size ensures your task will
get enough memory. There is no overhead involved, it just leaves more
room for the heap to grow. -i and -k gives you some additional
information, which may be useful, e.g. precision and recall for all
classes. In case your model performs well, it makes sense to save it
via -d - you can always delete it later! The implicit
cross-validation gives a more reasonable estimate of the expected
accuracy on unseen data than the training set accuracy. The output both
of standard error and output should be redirected, so you get both
errors and the normal output of your classifier. The last & starts
the task in the background. Keep an eye on your task via top
and if you notice the hard disk works hard all the time (for linux),
this probably means your task needs too much memory and will not finish
in time for the exam. ;-) In that case, switch to a faster classifier
or use filters, e.g. for Resample (http://weka.sourceforge.net/doc/weka/filters/supervised/instance/Resample.html) to reduce the size of your dataset or StratifiedRemoveFolds (http://weka.sourceforge.net/doc/weka/filters/supervised/instance/StratifiedRemoveFolds.html) to create training and test sets - for most classifiers, training takes more time than testing.
So, now you have run a lot of experiments -- which classifier is best? Try
cat *.out | grep -A 3 "Stratified" | grep "^Correctly"
...this should give you all cross-validated accuracies. If the
cross-validated accuracy is roughly the same as the training set
accuracy, this indicates that your classifiers is presumably not
overfitting the training set.
Now you have found the best classifier. To apply it on a new dataset, use e.g.
java weka.classifiers.trees.J48 -l J48-data.model -T new-data.arff
You will have to use the same classifier to load the model, but you need not set any options. Just add the new test file via -T. If you want, -p first-last
will output all test instances with classifications and confidence,
followed by all attribute values, so you can look at each error
separately.
The following more complex csh script creates datasets for
learning curves, i.e. creating a 75% training set and 25% test set from
a given dataset, then successively reducing the test set by factor 1.2
(83%), until it is also 25% in size. All this is repeated thirty times,
with different random reorderings (-S) and the results are written to
different directories. The Experimenter GUI in WEKA can be used to
design and run similar experiments.
#!/bin/csh
foreach f ($*)
  set run=1
  while ( $run <= 30 )
    mkdir $run >&! /dev/null
    java weka.filters.supervised.instance.StratifiedRemoveFolds -N 4 -F 1 -S $run -c last -i ../$f -o $run/t_$f
    java weka.filters.supervised.instance.StratifiedRemoveFolds -N 4 -F 1 -S $run -V -c last -i ../$f -o $run/t0$f
    foreach nr (0 1 2 3 4 5)
      set nrp1=$nr
      @ nrp1++
      java weka.filters.supervised.instance.Resample -S 0 -Z 83 -c last -i $run/t$nr$f -o $run/t$nrp1$f
    end

    echo Run $run of $f done.
    @ run++
  end
end
If meta classifiers are used, i.e. classifiers whose options include classifier specifications - for example, StackingC (http://weka.sourceforge.net/doc/weka/classifiers/meta/StackingC.html) or ClassificationViaRegression (http://weka.sourceforge.net/doc/weka/classifiers/meta/ClassificationViaRegression.html), care must be taken not to mix the parameters. E.g.
java weka.classifiers.meta.ClassificationViaRegression -W weka.classifiers.functions.LinearRegression -S 1 \
  -t data/iris.arff -x 2
gives us an illegal options exception for -S 1. This
parameter is meant for LinearRegression, not for
ClassificationViaRegression, but WEKA does not know this by itself. One
way to clarify this situation is to enclose the classifier
specification, including all parameters, in "double" quotes, like this:
java weka.classifiers.meta.ClassificationViaRegression -W "weka.classifiers.functions.LinearRegression -S 1" \
  -t data/iris.arff -x 2
However this does not always work, depending on how the option
handling was implemented in the top-level classifier. While for
Stacking this approach would work quite well, for
ClassificationViaRegression it does not. We get the dubious error
message that the class weka.classifiers.functions.LinearRegression -S 1
cannot be found.
Fortunately, there is another approach: All parameters given after --
are processed by the first sub-classifier; another -- lets us specify
parameters for the second sub-classifier and so on.
java weka.classifiers.meta.ClassificationViaRegression -W weka.classifiers.functions.LinearRegression \
  -t data/iris.arff -x 2 -- -S 1
In some cases, both approaches have to be mixed, for example:
java weka.classifiers.meta.Stacking -B "weka.classifiers.lazy.IBk -K 10" \
  -M "weka.classifiers.meta.ClassificationViaRegression -W weka.classifiers.functions.LinearRegression -- -S 1" \
  -t data/iris.arff -x 2
Notice that while ClassificationViaRegression honors the --
parameter, Stacking itself does not. Sadly the option handling for
sub-classifier specifications is not yet completely unified within
WEKA, but hopefully one or the other approach mentioned here will work.
Download the source callClassifier.java or the compiled version callClassifier.class (http://alex.seewald.at/WEKA/callClassifier.class).
Initially, I intended to use this as an illustrative example of calling
WEKA routines from Java, but it has become far too complex for
that. ;-)
It offers similar functionality to calling classifiers with -p 0, however unlike Evaluation (http://weka.sourceforge.net/doc/weka/classifiers/Evaluation.html),
it outputs the complete class probability for any appropriate
classifier. It works with cross-validation as well as a separate test
set, so it is possible to get all predictions within the cv. This is
not as easy as it sounds, which you will notice if you take a look at
the source code.
There are a variety of ways to enable callClassifier to run;
hopefully one of them will work for you. Compilation is via javac. If
javac is not found, you probably do not have the development kit
installed - in that case try downloading callClassifier.class. If
classes are not found, check if weka.jar is in the CLASSPATH.
setenv CLASSPATH .:$WEKAHOME/weka.jarjava callClassifier weka.classifiers.trees.J48 -t iris.arff
java -classpath .:$WEKAHOME/weka.jar weka.classifiers.trees.J48 -t iris.arff
A similar program which predates callClassifier is WekaClassifier (http://www.d.umn.edu/~tpederse/sensetools.html) (at bottom of page). It also works for older WEKA versions before 3-4 (those with a separate DistributionClassifier class).