More about MLSS 2010 could be found http://mlss10.rsise.anu.edu.au/proceedings

Tuesday, December 28, 2010
Thursday, December 23, 2010
[ASR] Still Tandem systems

Download now or preview on posterous
combining phonetic attributes using conditional random field.pdf (112 KB) The attached paper models phonetic attributes with CRF models. However, the sentence interests me most is the following one:
As described in [1] we used the linear output of the MLPs with a KL transform applied to them to decorrelate the features, as this gave the best results for the HMM system.
[1] H. Hermansky, D. Ellis, and S. Sharma, "Tandem connectionist feature stream extraction for conventional HMM systems", in Proc. of the ICASSP 2000.
Maybe sometime we could also try to refine the posterior features from NN for HMM systems.
Monday, December 20, 2010
[Linux] Mac configure type
In many cases the build step involves running a configure script. Occasionally you'll run a configure script that gives error message stating that the host type cannot be determined. In such a case, you can usually either specify the configure option --host=powerpc-apple-darwin6.4 as I've done in the examples below. (Note in this case, we are using darwin6.4. To determine the correct release of darwin, enter the command uname -r.) You can alternatively copy two files into the build directory, that is, into the same directory that contains the script configure.
Occasionally, the configure option --build=powerpc-apple-darwin6.4 is needed to produce the desired result (again assuming we're using darwin release 6.4). In some cases, there are additional steps to be performed. ...
Code:
cp /usr/share/libtool/config.guess . cp /usr/share/libtool/config.sub .
Sunday, December 19, 2010
Thursday, December 16, 2010
[Basic] Whitening
From: http://cis.legacy.ics.tkk.fi/aapo/papers/IJCNN99_tutorialweb/node26.html
Another useful preprocessing strategy in ICA is to first whiten the observed variables. This means that before the application of the ICA algorithm (and after centering), we transform the observed vector ![]() linearly so that we obtain a new vector
linearly so that we obtain a new vector ![]() which is white, i.e. its components are uncorrelated and their variances equal unity. In other words, the covariance matrix of
which is white, i.e. its components are uncorrelated and their variances equal unity. In other words, the covariance matrix of ![]() equals the identity matrix:
equals the identity matrix:
| (30) |
The whitening transformation is always possible. One popular method for whitening is to use the eigen-value decomposition (EVD) of the covariance matrix![]() , where
, where ![]() is the orthogonal matrix of eigenvectors of
is the orthogonal matrix of eigenvectors of ![]() and
and ![]() is the diagonal matrix of its eigenvalues,
is the diagonal matrix of its eigenvalues, ![]() . Note that
. Note that ![]() can be estimated in a standard way from the available sample
can be estimated in a standard way from the available sample ![]() . Whitening can now be done by
. Whitening can now be done by
where the matrix
Whitening transforms the mixing matrix into a new one, ![]() . We have from (4) and (34):
. We have from (4) and (34):
| (32) |
The utility of whitening resides in the fact that the new mixing matrix
| (33) |
Here we see that whitening reduces the number of parameters to be estimated. Instead of having to estimate the n2 parameters that are the elements of the original matrix
It may also be quite useful to reduce the dimension of the data at the same time as we do the whitening. Then we look at the eigenvalues dj of ![]() and discard those that are too small, as is often done in the statistical technique of principal component analysis. This has often the effect of reducing noise. Moreover, dimension reduction prevents overlearning, which can sometimes be observed in ICA [26].
and discard those that are too small, as is often done in the statistical technique of principal component analysis. This has often the effect of reducing noise. Moreover, dimension reduction prevents overlearning, which can sometimes be observed in ICA [26].
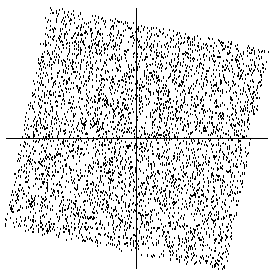
A graphical illustration of the effect of whitening can be seen in Figure 10, in which the data in Figure 6 has been whitened. The square defining the distribution is now clearly a rotated version of the original square in Figure 5. All that is left is the estimation of a single angle that gives the rotation.
In the rest of this tutorial, we assume that the data has been preprocessed by centering and whitening. For simplicity of notation, we denote the preprocessed data just by ![]() , and the transformed mixing matrix by
, and the transformed mixing matrix by ![]() , omitting the tildes.
, omitting the tildes.
Monday, December 13, 2010
[Basic] Cross-Entropy Criterion
Cross-Entropy Criterion is actually the Kullback Leibler Divergence.
KL divergence is a non-symmetric measure of the difference between two probability distributions P and Q. KL measures the expected number of extra bits required to code samples from P when using a code based on Q, rather than using a code based on P. Thus, P is the true distribution and Q is the estimated distribution. Typically P represent the "true" distribution of data, observations, or a precise calculated theoretical distribution. The measure Q typically represent a theory, model, description, or approximation of P.
Although it is often intuited as a distance metric, the KL divergence is not a true metric - for example, it's not symmetric: the KL from P to Q is not necessarily the same as the KL from Q to P.
For probability distributions P and Q of a discrete random variable their KL divergence is defined to be:
D_KL(P||Q)=\sum{ P(i) log[ P(i)/Q(i) ] }
In words, it is the average of the logarithmic difference between the probabilities P and Q, where the average is taken using the probabilities P. The KL divergence is only defined if P and Q both sum to 1 and if Q(i) > 0 for any i such that P(i) > 0. If the quantity 0 log 0 appears in the formula, it is interpreted as zero.
The attached document is the explanation for KL divergence from wikipedia.
Friday, December 10, 2010
Printing in NUS SoC
Printing in the School of Computing
Printing in SoC has long been a nightmare for users of "unsupported systems" like us. Fortunately, the most difficult part is actually *figuring out* how to get printing working on Linux, and since we already have, the steps you need to take to enable printing on your Linuxbox is relatively simple, especially if you're using a fairly recent and popular distro.
Here are detailed steps for recent versions of Ubuntu and OpenSUSE. They should be fairly similar in comparable distros.
Printing in Ubuntu
Since around the time of Hardy, everything you need to print to the SoC printers is available out-the-box on an Ubuntu system. To start printing, you simply need to configure a printer as follows:
Step 1
Make sure you are either connected to PEAP or to SoCVPN.
Go to System > Administration > Printing, key in your password, and hit the "New" button on the window that appears.
Step 2
Select Network Printer > Windows Printer via Samba on the left-hand column.
On the right, enter the following in the textfield under "SMB Printer"
nusstu/nts27.comp.nus.edu.sg/psts-dx
You can replace 'psts-dx' above with the name of whatever target printer you desire to add.
Check "Set authentication details now" and key in your NUSNET credentials.

You can hit "verify" to see if your connection is successful. Hit "Forward" when you're done.
Step 3
Select the printer manufacturer here. For the COM1 printers, pick "Lexmark". Then hit "Forward".

Step 4
Select the printer model here. For the COM1 printers, pick "T642".

Step 5
Optionally Key in some meta information for your new printer.

Hit "Apply" and you're done!!
Print a test page to boost your ego.
Printing in Kubuntu
IdyllicTux has a Video Tutorial on printing on Kubuntu. Steps are highly similar to those for Ubuntu.
Printing in OpenSUSE
This is based on the KDE version. Steps for OpenSUSE Gnome should be similar.
Step 1
Make sure you are either connected to PEAP or to SoCVPN.
Bring up the Yast Administrator Settings Panel (Application > System > Administrator Settings) and select "Printer"
In the window that opens, make sure "Printer configurations" is selected on the left-hand panel, then click "Add" near the bottom-center.
Step 2
Click "Connection Wizard" at the top-right.
In the page that results, Select "Print via Server Machine > Microsoft Windows/SAMBA (SMB/CIFS)" on the left-hand panel.
On the right, key in
- "nts27.comp.nus.edu.sg" for Server (NetBIOS Host Name)
- Your target printer name for Printer (Share Name), eg. psts-dx
- "nusstu" for Workgroup (Domain Name)
- Your NUSNET credentials under "Authenticate As"
- The printer manufacturer - "Lexmark" for the COM1 printers on the last drop-down.

Test the connection if you like. Hit "ok" when you're done.
Step 3
Under "Assign Driver", look for and select the driver for the target printer. For the COM1 printers, select the entry beginning with "Lexmark T642".
If you cannot find this in the list, you may need to install a driver package. Click "Add Driver" to do so. The following page should appear:

Check off the driver packages you would like to install. "cups-drivers" should contain the T642 driver for the COM1 printers, so check it if you haven't. Hit "ok" to install the driver packages.
You will be returned to the original page once you're done, and you should now find your driver in the list. Select it and hit "ok".

You're done!! Print a test page to boost your ego.
A word on changing password
The Yast printer configuration tool is a little unwieldy, and shockingly does not appear to have a direct way of changing your authentication password. When you change your NUSNET password, simply delete your existing printing configurations and re-add them following the steps above.
Monday, December 6, 2010
[Ogre] SDK Install
After dragging the SDK folder to local disk, before open the xcode project, be sure to run following command to make the xcode project adjusted to the current environment.
cmake -GXcode .
Saturday, December 4, 2010
3D Little Human Figures Clipart Big Collection

3D Little Human Figures Clipart – Big Collection
115 jpg | Up to 9001*6000 pix | 300 dpi | 282 Mb rar
Download:
Part 1 http://depositfiles.com/en/files/a9wxaatgz
Part 2 http://depositfiles.com/en/files/7f2ftolkj
Part 3 http://depositfiles.com/en/files/bozjkzeza
From: http://lordofdesign.com/3d-little-human-figures-clipart-big-collection/
Wednesday, December 1, 2010
[Latex] LaTex: Fixing Wrong Figure Numbers
From: http://www.terminally-incoherent.com/blog/2007/04/14/latex-fixing-wrong-figure-numbers/
ONE SENTENCE: PUT THE LABEL COMMAND AFTER CAPTION COMMAND FOR FIGURES.
What I tell you right now may save you hours of extensive debugging, cursing under your breath, commenting out custom code dealing with figure layout and much frustration. Whenever you use figures, always (and I mean ALWAYS EVER FOREVER ALWAYS) put \caption first, and \labelsecond like this:
\begin{figure}[htp] \centering \includegraphics{image.eps} \caption{Some Image} \label{fig:some-image} \end{figure}If you put the \label above \caption you will run into trouble when referencing figures inside subsections. In my case, the caption underneath the figure would say Fig. 4.2 but the output of \ref would be 4.3.10 because somehow it was picking up the section numbers wrong. The whole damn chapter 4 had the caption/label pairs flipped – but the rest of the document was fine. I have no clue what possessed me to write it this way.
Subscribe to:
Posts (Atom)