Showing posts with label OGRE. Show all posts

Friday, March 20, 2009

Shift UI in Ogre dynamically

Changing UI dynamically in the application is needed especially when you want the user do something step by step.

At the beginning, I thought it would be very difficult. Also I found nothing when searching on the Internet. When I noticed the ui is loaded through following method:

CEGUI::Window *sheet=CEGUI::WindowManager::getSingleton().loadWindowLayout(
(CEGUI::utf8*)"shapegui.layout");
mSystem->setGUISheet(sheet);

How about directly changing the ui when certain events occurs. Have a try. I just added the above code to a button event, using a new UI layout file. When I click that button, it works!!!!

Ogre Rendering Loop

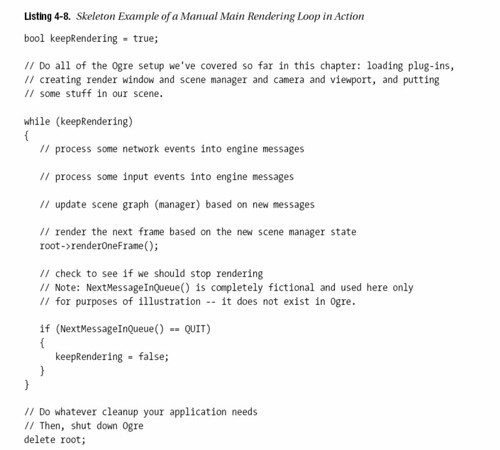
The typical Ogre application will render one frame after another, ceaselessly.That means we just start the Root::startRendering() method and everything will be done automatically.

However, sometimes we want to update the scene after we change some scene content. With Root::startRendering(), we can just do our redraw process and let the system to render the new scene.

Moreover, Root::startRendering() method simply starts a small loop that calls another method renderOneFrame().

Thus, we can manually do rendering  with renderOneFrame() method.

3369746541

Tga & imageset for CEGUI

Add static images to the CEGUI used in Ogre, we need assemble images into a tga files in the imageset form.

First, create a tga image file containing all the needed images.

1) Using Photoshop, create a new document with transparent background.

2) Put all the images in that document and arrange them in a good order and position;

3) Select only those will not be transparent parts and all these kinds of parts, in the channel frame, click the button"Save Selection as Channel" the one which is shown as a dark rectangle with whit circle. After clicking this button, a new alpha  channel will be created. Note, if there already exists an alpha channel delete it.

4) Save the document as tga file format. And this step is done.

Second, create a *.imageset file, which is a XML based file to describe the tga file, the format is something like this:

   1: <?xml version="1.0" ?>


   2: <Imageset Name="ShapeGUI" Imagefile="ShapeGUI.tga" NativeHorzRes="800" NativeVertRes="600" AutoScaled="true">


   3:       <Image Name="ShapeLabel" XPos="0" YPos="2" Width="190" Height="40" />


   4: </Imageset>


Finally, we can use those images in CEGUI.


When create a staticImage window, set the Image property to something like this:


   1: set:ShapeGUI image:ShapeLabel


Then it's done.

Develop your own coding style

For the comment, usually for single line comment we just use "//". Also, when we debug the application, to comment or uncomment some single code, we also use "//". Sometime it's better to distinguish them but not compulsory.

Therefore, I decide to use "///" to begin the informative comments and use "//" to just comment the code for debugging.


Appealing Character Factory

ACFactory

ACF

Thursday, March 19, 2009

Ogre Render Queue

A physical Engine

http://www.box2d.org/index.html


To use CEGUI in Ogre, I followed the tutorial in the wiki and added the gui to my existing code. However, I found that my drawing code draw twice!!!!!

One is drawn on the whole window and the other is draw as I desired in the gui frame window.

For two days searching on line, found nothing help.

I just comment everything and test every code part. Finally I found that both the gui and my drawing objects are in the RENDER_QUEUE_OVERLAY.

That's the problem!!!!!

By changing my drawing objects to RENDERE_WORLD_GEOMETRY_1, everything works well!!!!!!

Thank goodness!!!

Tuesday, March 10, 2009

To start with Ogre

Add "stdio.h" header file to the orge application can enable the command line promote to display the execution information.

Be careful about the namespaces!!!!

As many data structures in Ogre uses the Ogre namespace, if you want to use it, do remember to use the Ogre namespace!!!!!!!


Steps to start creating a project based Ogre:

1. Create an empty project.

2. In the project properities ( Make sure you are editing All Configurations):

a. OutputDirectory -> bin\$(ConfigurationName)

b. Intermediate Directory -> obj\$(ConfigurationName)

c. Debugging|Working Directory -> $(OutDir)

d. If for debug mode, Linker|Input -> OgreMain_d.lib OIS_d.lib CEGUIBase_d.lib OgreGUIRenderer_d.lib ode.lib

e. If for release mode, Linker|Input -> OgreMain.lib OIS.lib CEGUIBase.lib OgreGUIRenderer.lib ode.lib

f. Default, vs will organize the source files in filters, but in the project directory, they are all together not in separate folders. To show it in separate folders, in the Options|Project and Solutions|VC++ Project Settings|Solution Explorer Mode -> Show all files. And then you need to manually add folders such as src and include.

g. Copy the debug/release files in the Ogre sdk to your project's debug/release folder

h. Copy the media folder in the Ogre sdk to your project folder, modify it if necessary

Next begin your work!

Really a tedious way, however, I tried one afternoon to create a wizard to automate this process and I failed. Maybe just do it manually it not that bad...

Wednesday, March 4, 2009

Camera

One thing about Ogre Cameras that is different from what you may expect is that you should only be using one Camera at a time (for now). That is, we do not create a Camera for viewing one portion of a scene, a second camera for viewing another portion of the scene and then enabling or disabling cameras based on what portion of the scene we want to display. Instead the way to accomplish this is to create SceneNodes which act as "camera holders". These SceneNodes simply sit in the scene and point at what the Camera might want to look at. When it is time to display a portion of the Scene, the Camera simply attaches itself to the appropriate SceneNode.

Tuesday, March 3, 2009

Begin OGRE

After the SDK is installed, add "include" and "bin" directory of the SDK to the Visual Studio's VC++ Directories.

For each project, add "CEGUIBase.lib", "ode.lib", "OgreGUIRenderer.lib", "OgreMain.lib", "OIS.lib" and "ReferenceAppLayer_d.lib" to project's Link menu and Additional Dependencies. (Add all or add only the one you will use in your code.) Moreover, for the first 5 lib files, there is a version for debug: "CEGUIBase_d.lib", "OgreGUIRenderer_d.lib", "OgreMain_d.lib", "OIS_d.lib".

Missing a Configuration File or DLLs

If you try to launch your freshly built application but the program complains of missing DLLs or configuration files (*.cfg), then you probably did not copy them over from the OgreSDK folder. In Visual Studios, when you build your application in release mode, it puts the release executable in the [ProjectFolder]\bin\release folder, and the debug executable in the [ProjectFolder]\bin\debug folder. You must copy all the ".dll" and ".cfg" files over from the OgreSDK into the appropriate folders. That is, copy the files from [OgreSDK]\bin\release to [ProjectFolder]\bin\release and [OgreSDK]\bin\debug to [ProjectFolder]\bin\debug. You will also need to edit the resources.cfg file to point at the correct paths. See the next section for more information on this.

Also something in the "Resources.cfg" configuration file should be changed. However, I just copied the media folder to my project folder.

Cannot Launch the Application in Visual Studio

If you are using Visual Studio or Visual C++ to create the application and are having trouble launching it from the environment, the problem is most likely due to the debugger settings. If you press the play button (or go to the Start Debugging menu item) and you get an exception saying that a configuration file (*.cfg) cannot be found, then the Working Directory has probably not been set.

The exact instructions for fixing this will vary based on whichversion of Visual C++ you are using, so I cannot give you a direct walk through, but the basic steps should be the same. Right click on your project in the solution explorer (not the solution itself) and go to properties. Somewhere in the configuration properties should be options for "Debugging". In the debugging options there should be a field for "Working Directory". This should be set to the location that the executable file for your project is being placed.

If you are having trouble figuring out what to put there, try to mimic the "Command" field which should also be in the debugging options. For example, in Visual C++ 2003, the "Command" field should be something similar to "..\..\bin\$(ConfigurationName)\$(TargetFileName)". For the Working Directory, we need to remove the portion of the command which is the target file name (the executable). In this case, the working directory would be "..\..\bin\$(ConfigurationName)". The exact string you have to put there may vary based on your version of Visual C++ and on your build environment, so be sure to check what the Command field is before doing this. Be sure to change the Working Directory for both the Release and Debug configuration.

In Visual C++ 2005 it will probably be something different entirely. I've found the "..\..\bin\$(ConfigurationName)" directory a good thing to try first, if it still does not work you may have to play with it some, or consult some help from the Ogre forums.

The reason we have to do this is that Ogre expects certain files to be in the same directory as the executable, and without setting the working directory to be a directory with these files in it.


SceneNodes keep track of location and orientation for all of the objects attached to it. When you create an Entity, it is not rendered in the scene until you attach it to a SceneNode.In addition a SceneNode is not an object that is displayed on the screen. Only when you create a SceneNode and attach an Entity (or other object) to it is something actually displayed on the screen.

One major concept to note about SceneNodes is that a SceneNode's position is always relative to its parent SceneNode, and each SceneManager contains a root node to which all other SceneNodes are attached.

Google+